
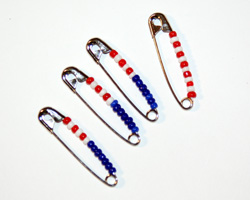
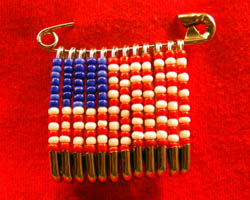
American Flag Beaded Safety Pin.
Children are good at making this American flag beaded safety pin craft because it takes dexterity and a fine eye to thread the little seed beads on the pin. I have found it can keep an older child busy for quite awhile! An adult may need to help thread the beaded pins onto the larger pin, which can be tricky at first.
Things Needed:
- 12 size 2 safety pins
- 1 size 3 safety pin
- Seed beads in red, white, and blue
- Pliers
- Flat headed tool, like a screwdriver
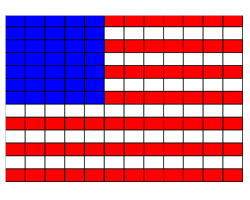
Text Version of Pattern:
Pins are going left to right; the bead order is the bottom
bead first and moving up, the same way
you would thread it on to the pin.
Pin 1:
1 red, 1 white, 1 red, 1 white, 1 red, 1 white, 7 blue
Pin 2: 1 red, 1 white, 1 red, 1 white, 1 red, 1 white, 7 blue
Pin 3: 1 red, 1 white, 1 red, 1 white, 1 red, 1 white, 7 blue
Pin 4: 1 red, 1 white, 1 red, 1 white, 1 red, 1 white, 7 blue
Pin 5: 1 red, 1 white, 1 red, 1 white, 1 red, 1 white, 7 blue
Pin 6: 1 red, 1 white, 1 red, 1 white, 1 red, 1 white, 1 red, 1 white, 1 red, 1 white, 1 red, 1 white, 1 red
Pin 7: 1 red, 1 white, 1 red, 1 white, 1 red, 1 white, 1 red, 1 white, 1 red, 1 white, 1 red, 1 white, 1 red
Pin 8: 1 red, 1 white, 1 red, 1 white, 1 red, 1 white, 1 red, 1 white, 1 red, 1 white, 1 red, 1 white, 1 red
Pin 9: 1 red, 1 white, 1 red, 1 white, 1 red, 1 white, 1 red, 1 white, 1 red, 1 white, 1 red, 1 white, 1 red
Pin 10: 1 red, 1 white, 1 red, 1 white, 1 red, 1 white, 1 red, 1 white, 1 red, 1 white, 1 red, 1 white, 1 red
Pin 11: 1 red, 1 white, 1 red, 1 white, 1 red, 1 white, 1 red, 1 white, 1 red, 1 white, 1 red, 1 white, 1 red
Pin 12: 1 red, 1 white, 1 red, 1 white, 1 red, 1 white, 1 red, 1 white, 1 red, 1 white, 1 red, 1 white, 1 red
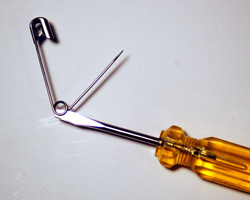
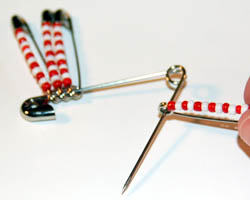
2.
Take your large safety pin, and open it. Using a flat head
screwdriver, wedge the flat head in between the safety pin loop at the
bottom of the pin. Once inserted, twist the screwdriver to pry the loop
open a little, as shown. The goal is to be able to have enough room to
allow each #2 safety pin to be threaded through this loop to the other
side.
3. Thread each #2 safety pin's loop onto the big safety pin. Thread it around the large pin's loop to get it onto the other side of the pin. This way, when you wear the pin, none of the pins will slide off. This is a little harder than it looks. You may need to experiment with the #2 safety pin orientation at first, but once you get the hang of it you will be putting on the safety pins in the right direction and order easily. When you are all done, use some pliers to scrunch down the big safety pin's loop tight again. You are all ready to wear your American flag beaded safety pin!
3. Thread each #2 safety pin's loop onto the big safety pin. Thread it around the large pin's loop to get it onto the other side of the pin. This way, when you wear the pin, none of the pins will slide off. This is a little harder than it looks. You may need to experiment with the #2 safety pin orientation at first, but once you get the hang of it you will be putting on the safety pins in the right direction and order easily. When you are all done, use some pliers to scrunch down the big safety pin's loop tight again. You are all ready to wear your American flag beaded safety pin!
Here is the website I found the instructions on! Enjoy!
No comments:
Post a Comment